CircularTools
- 效果演示:


FragmentTransactionExtended
- 效果演示:
PreLollipopTransition
- 效果演示:

TransitionPlayer
- 效果演示:
Menu Animation
- 效果演示:

android-flip
效果演示:

JazzyViewPager
- 效果演示:
效果演示:


属性动画,这个是在Android 3.0中才引进的,与view animation 最大的不同就是,它更改的是对象的实际属性,而View Animation(Tween Animation)中,其改变的是View的绘制效果,真正的View的属性保持不变,比如无论你在对话中如何缩放Button的大小,Button的有效点击区域还是没有应用动画时的区域,其位置与大小都不变。而在Property Animation中,改变的是对象的实际属性,如Button的缩放,Button的位置与大小属性值都改变了。而且Property Animation不止可以应用于View,还可以应用于任何对象。Property Animation只是表示一个值在一段时间内的改变,当值改变时要做什么事情完全是你自己决定的。
在Property Animation中,可以对动画应用以下属性:
Duration:动画的持续时间
TimeInterpolation:属性值的计算方式,如先快后慢
TypeEvaluator:根据属性的开始、结束值与TimeInterpolation计算出的因子计算出当前时间的属性值
Repeat Count and behavoir:重复次数与方式,如播放3次、5次、无限循环,可以此动画一直重复,或播放完时再反向播放
Animation sets:动画集合,即可以同时对一个对象应用几个动画,这些动画可以同时播放也可以对不同动画设置不同开始偏移
Frame refreash delay:多少时间刷新一次,即每隔多少时间计算一次属性值,默认为10ms,最终刷新时间还受系统进程调度与硬件的影响
ValueAnimator 表示一个动画,包含动画的开始值,结束值,持续时间等属性。
ValueAnimator封装了一个TimeInterpolator,TimeInterpolator定义了属性值在开始值与结束值之间的插值方法。
ValueAnimator还封装了一个TypeAnimator,根据开始、结束值与TimeIniterpolator计算得到的值计算出属性值。
ValueAnimator的父类和子类如图: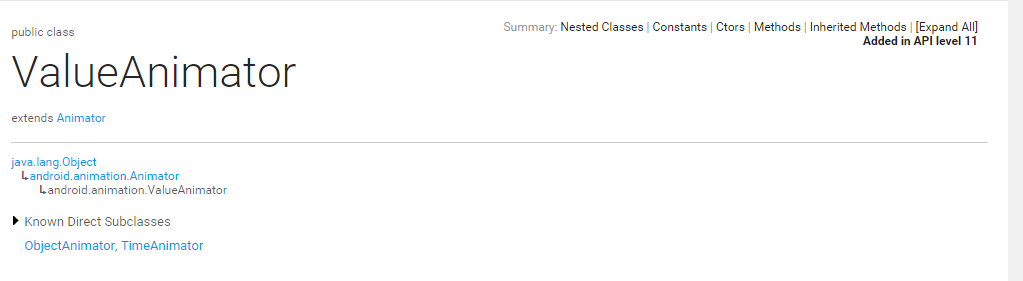 {ImgCap}value-animator.png{/ImgCap}
ValuAnimiator只完成了第一步工作,如果要完成第二步,需要实现ValueAnimator.onUpdateListener接口,这个接口只有一个函数onAnimationUpdate(),在这个函数中会传入ValueAnimator对象做为参数,通过这个ValueAnimator对象的getAnimatedValue()函数可以得到当前的属性值如:
1 | ValueAnimator animation = ValueAnimator.ofFloat(0f, 1f); |
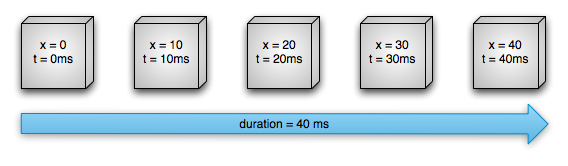
对于下图的动画,这个对象的X坐标在40ms内从0移动到40 pixel.按默认的10ms刷新一次,这个对象会移动4次,每次移动40/4=10pixel。
也可以改变属性值的改变方法,即设置不同的interpolation,在下图中运动速度先逐渐增大再逐渐减小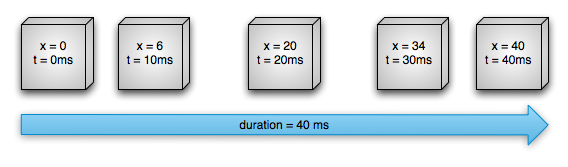
Animator.AnimatorListener
ValueAnimator.AnimatorUpdateListener
有时我们没有必要实现AnimatorListener 接口,可以用适配器类 AnimatorListenerAdapter代替有时我们没有必要实现AnimatorListener 只实现你想要的方法。
ValueAnimator的子类,要指定一个对象及该对象的一个属性,当属性值计算完成时自动设置为该对象的相应属性,即完成了Property Animation的全部两步操作。实际应用中一般都会用ObjectAnimator来改变某一对象的某一属性,但用ObjectAnimator有一定的限制,要想使用ObjectAnimator,应该满足以下条件:
1 | ObjectAnimator oa=ObjectAnimator.ofFloat(tv, "alpha", 0f, 1f); |
上面这段代码就是让textview的alpha属性从0f在5s内变化到1f ,即从完全不可见到完全可见。
常用的属性有:alpha,translationX,translationY,translationZ,rotation,rotationX,scaleX,scaleY…
AnimationSet提供了一个把多个动画组合成一个组合的机制,并可设置组中动画的时序关系,如同时播放,顺序播放等。
实现组合动画功能主要需要借助AnimatorSet这个类,这个类提供了一个play()方法,如果我们向这个方法中传入一个Animator对象(ValueAnimator或ObjectAnimator)将会返回一个AnimatorSet.Builder的实例,AnimatorSet.Builder中包括以下四个方法:
以下例子同时应用5个动画:
1 | ObjectAnimator a1 = ObjectAnimator.ofFloat(animTextView, "translationX", -500f, 0f); |
根据属性的开始、结束值与TimeInterpolation计算出的因子计算出当前时间的属性值,android提供了以下几个evalutor:
IntEvaluator:属性的值类型为int;
FloatEvaluator:属性的值类型为float;
ArgbEvaluator:属性的值类型为十六进制颜色值;
TypeEvaluator:一个接口,可以通过实现该接口自定义Evaluator。
自定义TypeEvalutor很简单,只需要实现一个方法,如FloatEvalutor的定义:
ValueAnimator.ofFloat()方法就是实现了初始值与结束值之间的平滑过度,那么这个平滑过度是怎么做到的呢?其实就是系统内置了一个FloatEvaluator,它通过计算告知动画系统如何从初始值过度到结束值
1 | public class FloatEvaluator implements TypeEvaluator { |
ViewGroup中的子元素可以通过setVisibility使其Visible、Invisible或Gone,当有子元素可见性改变时(VISIBLE、GONE),可以向其应用动画,通过LayoutTransition类应用此类动画:
transition.setAnimator(LayoutTransition.DISAPPEARING, customDisappearingAnim);
通过setAnimator应用动画,第一个参数表示应用的情境,可以以下4种类型:
mTransitioner.setStagger(LayoutTransition.CHANGE_APPEARING, 30);
此函数设置动画延迟时间,参数分别为类型与时间。
ViewPropertyAnimator提供了一种简单的方式来为View的部分属性设置动画,使用一个单一的Animator对象。它表现的更像 ObjectAnimator,因为他也要修改View对象的相应的属性值,但是当为多个属性同时设置动画时,它比 ObjectAnimator更高效,下面的代码片段显示了使用多个ObjectAnimator,单个ObjectAnimator,以及ViewPropertyAnimator来同时为View的x,y属性设置动画的情形:1
2
3
4
5ObjectAnimator animX = ObjectAnimator.ofFloat(myView, "x", 50f);
ObjectAnimator animY = ObjectAnimator.ofFloat(myView, "y", 100f);
AnimatorSet animSetXY = new AnimatorSet();
animSetXY.playTogether(animX, animY);
animSetXY.start();
1 | PropertyValuesHolder pvhX = PropertyValuesHolder.ofFloat("x", 50f); |
1 | myView.animate().x(50f).y(100f); |
注:Property Animation是在API11(android3.0)引入的,如果想兼容API11之前版本,可以使用 NineOldAndroids 开源框架。
众所周知,Android中的动画发展以3.0为分界分为两个阶段。3.0 之前,android支持两种动画模式,tween animation, frame animation, 在android3.0中又引入了一个新的动画系统:property animation.可通过NineOldAndroids项目在3.0之前的系统中使用Property Animation.本篇将主要整理了一下view animation 的定义和使用。
补间动画,给出两个关键帧,通过一些算法将给定属性值在给定的时间内在两个关键帧间渐变。这种动画只能应用于View对象,就是一系列View形状的变换,(主要有4种效果:缩放,平移,透明度渐变,旋转)动画的定义既可以用代码定义也可以用XML定义,当然,建议用XML定义。
两种方式的比较:
| Java code | XML | 效果 |
|---|---|---|
| AlphaAnimation | alpha | 渐变透明度动画效果 |
| ScaleAnimation | scale | 渐变尺寸伸缩动画效果 |
| TranslateAnimation | translate | 画面转换位置移动动画效果 |
| RotateAnimation | rotate | 画面转移旋转动画效果 |
在xml中的定义方式
1.在res目录中新建anim文件夹
2.在anim目录中新建一个根标签为test_anim.xml(注意文件名小写)
    <?xml version="1.0" encoding="utf-8"?>
    <set xmlns:android="http://schemas.android.com/apk/res/android"
    android:interpolator="@[package:]anim/interpolator_resource"
    android:shareInterpolator=["true" | "false"] >
    <alpha
    android:fromAlpha="float"
    android:toAlpha="float" />
    <scale
    android:fromXScale="float"
    android:toXScale="float"
    android:fromYScale="float"
    android:toYScale="float"
    android:pivotX="float"
    android:pivotY="float" />
    <translate
    android:fromXDelta="float"
    android:toXDelta="float"
    android:fromYDelta="float"
    android:toYDelta="float" />
    <rotate
    android:fromDegrees="float"
    android:toDegrees="float"
    android:pivotX="float"
    android:pivotY="float" />
    <set>
    ...
    </set>
</set>
例如:定义一个旋转动画 R.anim.rotate_anim
<?xml version="1.0" encoding="utf-8"?>
<set xmlns:android="http://schemas.android.com/apk/res/android"
android:shareInterpolator="false" >
<rotate
    android:duration="1500"
    android:fromDegrees="0"
    android:interpolator="@android:anim/linear_interpolator"
    android:pivotX="50%"
    android:pivotY="50%"
    android:repeatCount="-1"
    android:repeatMode="restart"
    android:startOffset="-1"
    android:toDegrees="+360" />
</set>
注:布局文件必须有一个独立的根元素,可以是
android:interpolator
应用于动画的插值器。该值必须是一个指定了插值器资源的引用(不是一个插值器的类名),在平台中有缺省的插值器资源可以使用,或者你可以创建自己的插值器资源,可以看下面关于插值器的讨论。
android:shareInterpolator
Boolean 值, true:代表在所有的子元素中共享同一个插值器
java代码中定义方式
1 | //在代码中定义 动画实例对象 |
在代码中使用动画
1 | ImageView image = (ImageView) findViewById(R.id.image); |
XML定义方法中各个参数属性
Duration[long]: 属性为动画持续时间,时间以毫秒为单位
fillAfter [boolean]:当设置为true ,该动画转化在动画结束后被应用 加在
fillBefore[boolean]:当设置为true ,该动画转化在动画开始前被应用 加在
repeatCount[int]:动画的重复次数
RepeatMode[int]:定义重复的行为,1:重新开始 2:plays backward
startOffset[long]:动画之间的时间间隔,从上次动画停多少时间开始执行下个动画
zAdjustment[int]:定义动画的Z Order的改变,0:保持Z Order不变,1:保持在最上层,-1:保持在最下层
帧动画,就像GIF图片,通过一系列Drawable依次显示来模拟动画的效果。在XML中的定义方式如下:
res/anim/frame_anim
1 | <animation-list xmlns:android="http://schemas.android.com/apk/res/android" |
注:必须以
1 | ImageView image = (ImageView) findViewById(R.id.image); |
在实际使用时要注意:
Glide 被用来在ImageView 播放gif图,使用也非常简单。
下面演示在Android studio上使用Glide
1 | dependencies { |
在布局文件中如:activity_main.xml中加上imageview布局
1 | <ImageView |
加载本地的gif,确保gif资源放在res/raw下。MainActivity中的代码:
1 | public class MainActivity extends Activity { |
#####Gradle 常用命令
./gradlew -v 版本号

./gradlew clean 清除项目(module)目录下的build文件夹

./gradlew build 检查依赖并编译打包

(以上命令需要到项目的根目录下执行,Windows系统上如果执行不了以上命令,用gradlew.bat 代替gradlew)

./gradlew assembleDebug 编译并打Debug包

./gradlew assembleRelease 编译并打Release的包

除此之外,assemble还可以和productFlavors结合使用,具体在下一篇多渠道打包进一步解释。

./gradlew installRelease Release模式打包并安装

./gradlew uninstallRelease 卸载Release模式包
apply plugin: 'android'
//添加依赖包
dependencies {
    compile fileTree(dir: 'libs', include: '*.jar')//添加libs文件夹下的所有jar包
    compile project(':appcompat_v7') //这里添加其他依赖,可以是本地、远程的库,例如本地libraries/support_v7的库
}

//下面一段是将libs/*/*.so文件加入打包
//如果你的项目是使用Eclipse+ADT建立的,则需要这段代码
//task copyNativeLibs(type: Copy) {
//    from(new File('libs')) { include '**/*.so' }
  //  into new File(buildDir, 'native-libs')
//}

android {
//下面两行是编译sdk版本和buildTool的版本
    compileSdkVersion 21
    buildToolsVersion "21.1.0"

    //以下是签名信息
    signingConfigs {
        myConfigs {
            storeFile file("new.keystore")
            keyAlias "new.keystore"
            keyPassword "111111"
            storePassword "111111"
        }
    }

    buildTypes{
        release {
            minifyEnabled true//打包时过滤掉没有用到的代码
            shrinkResources true//打包时过滤掉没有用到的资源文件
            signingConfig signingConfigs.myConfigs
        }
    }
    //Gradle编译禁用Lint报错
    lintOptions {
        abortOnError false
    }

        /**
         * 渠道打包(不同包名)
         */
        productFlavors {
            a {
                applicationId = 'com.demo.yinyongbao'
                manifestPlaceholders = [installChanel:"应用宝"]
            }
            b {
                applicationId='com.demo.wandoujia'
                manifestPlaceholders = [installChanel: "豌豆荚"]
            }
        }
    productFlavors.all { flavor ->
        flavor.manifestPlaceholders = [installChanel: name]
    }
    sourceSets {
        main {
            manifest.srcFile 'AndroidManifest.xml'
            java.srcDirs = ['src']
            resources.srcDirs = ['src']
            aidl.srcDirs = ['src']
            renderscript.srcDirs = ['src']
            res.srcDirs = ['res']
            assets.srcDirs = ['assets']
        }

        // Move the tests to tests/java, tests/res, etc...
        instrumentTest.setRoot('tests')

        // Move the build types to build-types/
        // For instance, build-types/debug/java, build-types/debug/AndroidManifest.xml, ...
        // This moves them out of them default location under src//... which would
        // conflict with src/ being used by the main source set.
        // Adding new build types or product flavors should be accompanied
        // by a similar customization.
        debug.setRoot('build-types/debug')
        release.setRoot('build-types/release')
    }
}
Manifest 文件里面写上(以友盟统计为例)
<meta-data
            android:name="InstallChannel"
            android:value="${installChanel}"/>
这样就可以进到项目的根目录,执行 gradlew clean 和gradlew build
如果上面的脚本可以被正常执行gradlew build 将会生成下面8个apk包
Demo-a-debug.apk Demo-a-debug-unaligned.apk Demo-a-release.apk
Demo-a-release-unaligned.apk Demo-b-debug.apk Demo-b-debug-unaligned.apk
Demo-b-release.apk Demo-b-release-unaligned.apk

我们也可以执行 gradlew assemBRelease(可简写gradlew assemBR) 将会生成两个apk包
Demo-b-release.apk  Demo-b-release-unaligned.apk
build.gradle 还有其他写法
apply plugin: 'com.android.application'

def releaseTime() {
    return new Date().format("yyyy-MM-dd", TimeZone.getTimeZone("UTC"))
}

android {
    compileSdkVersion 21
    buildToolsVersion '21.1.2'

    defaultConfig {
        applicationId "com.boohee.*"
        minSdkVersion 14
        targetSdkVersion 21
        versionCode 1
        versionName "1.0"

        // dex突破65535的限制
        multiDexEnabled true
        // 默认是umeng的渠道
        manifestPlaceholders = [UMENG_CHANNEL_VALUE: "umeng"]
    }

    lintOptions {
        abortOnError false
    }

    signingConfigs {
        debug {
            // No debug config
        }

        release {
            storeFile file("../yourapp.keystore")
            storePassword "your password"
            keyAlias "your alias"
            keyPassword "your password"
        }
    }

    buildTypes {
        debug {
            // 显示Log
            buildConfigField "boolean", "LOG_DEBUG", "true"

            versionNameSuffix "-debug"
            minifyEnabled false
            zipAlignEnabled false
            shrinkResources false
            signingConfig signingConfigs.debug
        }

        release {
            // 不显示Log
            buildConfigField "boolean", "LOG_DEBUG", "false"

            minifyEnabled true
            zipAlignEnabled true
            // 移除无用的resource文件
            shrinkResources true
            proguardFiles getDefaultProguardFile('proguard-android.txt'), 'proguard-rules.pro'
            signingConfig signingConfigs.release

            applicationVariants.all { variant ->
                variant.outputs.each { output ->
                    def outputFile = output.outputFile
                    if (outputFile != null && outputFile.name.endsWith('.apk')) {
                        // 输出apk名称为boohee_v1.0_2015-01-15_wandoujia.apk
                        def fileName = "boohee_v${defaultConfig.versionName}_${releaseTime()}_${variant.productFlavors[0].name}.apk"
                        output.outputFile = new File(outputFile.parent, fileName)
                    }
                }
            }
        }
    }

    // 友盟多渠道打包
    productFlavors {
        wandoujia {}
        _360 {}
        baidu {}
        xiaomi {}
        tencent {}
        taobao {}
        ...
    }

    productFlavors.all { flavor ->
        flavor.manifestPlaceholders = [UMENG_CHANNEL_VALUE: name]
    }
}

dependencies {
    compile fileTree(dir: 'libs', include: ['*.jar'])
    compile 'com.android.support:support-v4:21.0.3'
    compile 'com.jakewharton:butterknife:6.0.0'
    ...
}
Manifest 文件里配置
<meta-data
    android:name="UMENG_CHANNEL"
    android:value="${UMENG_CHANNEL_VALUE}" />
Welcome to Hexo! This is your very first post. Check documentation for more info. If you get any problems when using Hexo, you can find the answer in troubleshooting or you can ask me on GitHub.
Quick Start
1 | $ hexo new "My New Post" |
More info: Writing
1 | $ hexo server |
More info: Server
1 | $ hexo generate |
More info: Generating
1 | $ hexo deploy |
More info: Deployment
参考:简书